isave.PURL is usually used for two main reasons:
- A personal and customized on-line campaign page or a landing page for “read more” links
- A form for collecting data from the customer (contact).
The interface explained
You will find isave.PURL module in the left column marked with a globe icon.
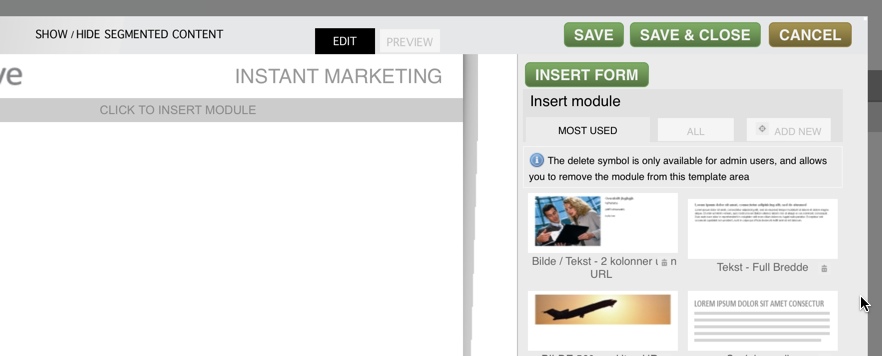
To insert a form, you first have to insert a module, and then click in the green button insert form.
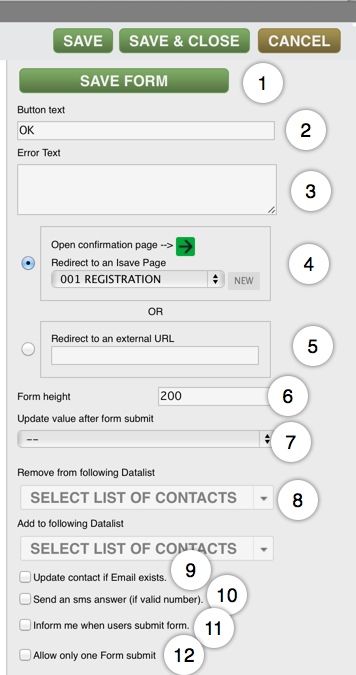
1. Save form
2. Text to “send data” button
3. Error text if the form is incomplete.
4. Landing page of the completed form (another isave.PURL page).
5. Landing page of the completed form (external page).
6. Height of the form
7. Update a field specification that does not exist in the form.
8. Remove and add the contact to the data list (when data is submitted).
9. Updating contact details if the e-mail allready exists in isave.
10. Send receipt of an SMS (requires the mobile field to be filled in).
11. Inform yourself when users submit the form.
12. Allow only one form submit.
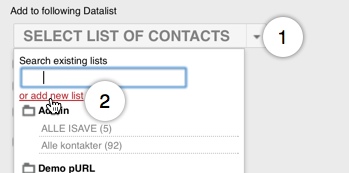
You can also create new data lists by clicking the NEW button if you have not created a data list in advance.
You can get an automatically e-mail notification when someone is added to the list. Enter your e-mail address and a descriptive text that tells you which list/form is updated and the information about this person. You can use the same codes for demographic data that you use in your newsletter. These fields are: (##Name##) (##FirstName##) (##LastName##) (##Email##) (##Mobile##), but you can also use other fields if you added til at your company. Use the syntax as follows: (##The_name_of_the_demographic_field##).
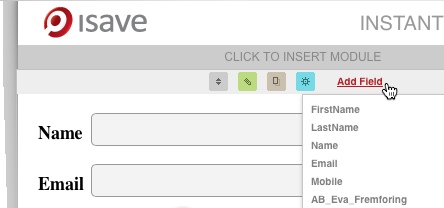
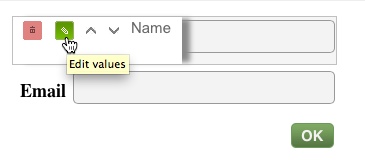
When making a form you always get the fields Name and Email. You can add new fields, like phone.
When you hover over the fields, it will look like the picture above. You can delete the field with the trashcan, edit the field with the pencil, or move the field with the arrows.
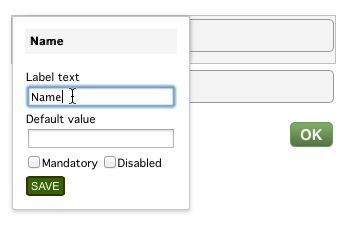
When you want to edit, this box will appear. Here you can rename the field, and set a default value.
Mandatory = Mandatory field
Diasabled = Not editable
Preview
After you have saved the form (1) and pressed the “save & close” button (2), you can view the Purl in browser pressing the “eye” icon.
When you click on the View button, the page opens in a new window.
If you copy this link on your homepage or intranet the PURL page will not have any relations to the isave.Contacs database and thus not be very personal. But could be very useful as a start form for your newsletter or other types of campaigns.
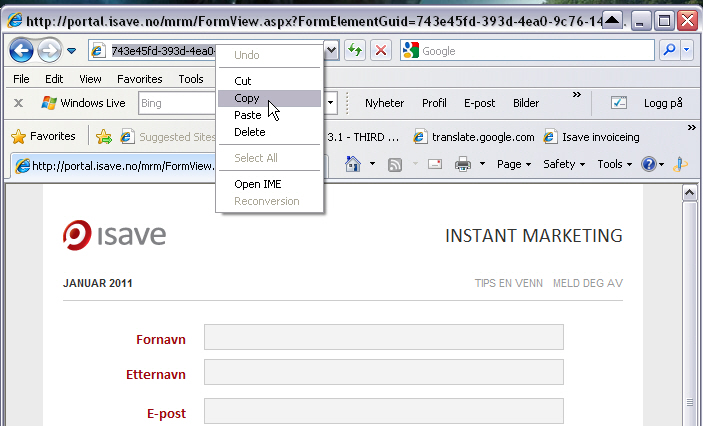
You can copy the link from the address bar and then put it behind a button on your intranet / website (sign up, etc.)..
If you copy the link and publish it without any relation to a isave.Contacs database the form will be empty when the user registers. If you make a isave.eDM mail with a link to a isave.PURL form, the form will be personalized.
Add Link to a PURL page in isave.eDM by clicking the HYPER LINK button in text-based articles. Choose PURL as type of link and select the page you want to link to. Title field is the name of the link in the e-mail and Name (for reports) are used in reports to differentiate the links contacts have clicked on in the e-mail blast.
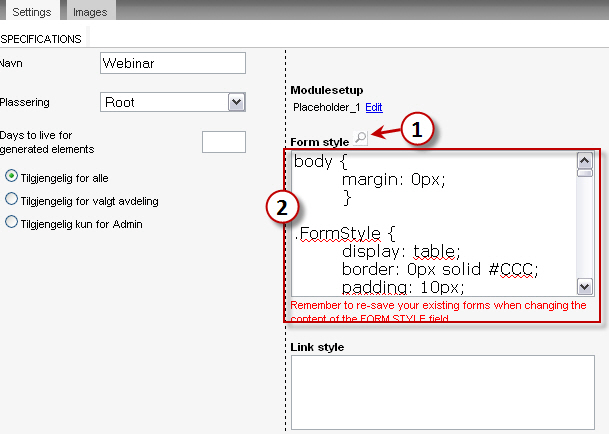
Formatting a Form
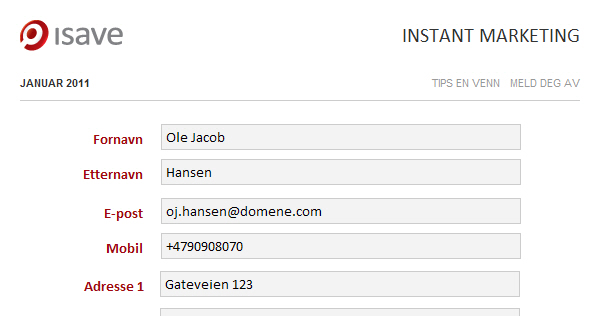
The appearance of forms is defined in the CSS styles that are saved in the PURL template.
1. Click on the magnifying glass icon to view (or copy) an example of all the CSS classes for forms.
2. Paste in your own CSS style or the sample style in the field FORM STYLE.
Note that if you change something in a CSS style, you must open and re-save the form again for the new CSS style is applied.
Overview of all CSS classes in PURL form
.FormStyle is used to set the formatting of the form (eg. left or right justified).
.FormLabel is used to set the formatting of the label for a field.
.FormTextBox is used to set the formatting of the input field.
.FormDropdownlist is used to set the formatting of drop down lists.
.FormCheckboxlist is used to set the formatting of check box lists.
.FormRadiobuttonlist is used to set the formatting of radio button lists.
.FormSubmitButton is used to set the formatting of the submit button.
DOWNLOAD CSS STYLESHETT FOR THE FORM ABOVE
e {
display: table;
border: 0px solid #CCC;
padding: 10px;
margin: 5px;
}
.FormLabel {
font-family: Calibri, Arial, Helvetica, sans-serif;
color: #9e0b0f;
font-weight: bold;
font-size: 15px;
padding-right: 15px;
text-align: right;
width:120px;
}
.FormTextBox {
font-family: Calibri, Arial, Helvetica, sans-serif;
width: 350px;
background-color: #F3F3F3;
font-size:15px;
color: #000;
padding: 3px 4px 3px 4px;
margin-bottom: 5px;
border: 1px solid #CCC;
-webkit-border-radius: 2px;
-moz-border-radius: 2px;
}
.ToolTip {
padding-left: 155px;
font-family: Calibri;
font-size:15px;
color: #666;
font-Style: Italic;
}
.FormDropdownlist {
width: 228px;
background-color: #F3F3F3;
font-size:14px;
color: #000;
padding: 7px 5px 7px 5px;
margin-top: 10px;
margin-bottom: 10px;
border: 1px solid #999;
-webkit-border-radius: 5px;
-moz-border-radius: 5px;
}
.FormCheckboxlist {
font-family: Calibri;
font-size:15px;
color: #666;
padding: 7px 5px 7px 5px;
}
.FormRadiobuttonlist {
font-family: Calibri;
font-size:15px;
color: #666;
padding: 7px 5px 7px 5px;
}
.FormRadiobuttonText {
font-family: Calibri;
color: #666;
font-size: 15px;
padding-left: 5px;
}
.FormCheckboxText {
font-family: Calibri, Arial, Helvetica, sans-serif;
color: #666;
font-size: 15px;
padding-left: 5px;
}
.FormSubmitButton {
font-family: Calibri;
font-weight: bold;
font-size:16px;
color: #F2F2F2;
background-color: #066304;
margin-top: 20px;
padding: 4px 15px 4px 15px;
border:1px solid #055c04;
-webkit-border-radius: 5px;
-moz-border-radius: 5px;
}


