• FAQ
  • Administration
    • My profile
    • Edit the startpage
    • Customers
    • Groups
    • Address in basket
    • Activate microsite
    • Company Info
    • Users
    • Specifications
    • Asset Pricing & Hi-Res Workflow
    • Managing Suppliers
      • Assigning Suppliers
    • Jobs
    • Orders
      • Order mails
    • Reports
  • SYSTEM
    • Deploying & Managing Client Microsites
    • isave.BASKET
  • Print
    • Typical print work flow
    • Adding a static document
    • Adding templates & documents
    • Adding a template
      • Linking Data to Templates
      • Templates – how to – checklist
      • Error log – How does it work?
      • How to – Change Size
      • How to – Change Size A1 to A10
      • How to – StripCharacters
    • Mass update (How to quickly create a webshop in Isave)
    • Merge print template with datalist or CSV
    • DPI and resolution on images / ISO profiles download
  • ADS
    • Typical ad workflow
    • Ads Archive
  • FILES
  • eDM
    • An introduction to isave.eDM
    • Handling Subscribers
    • Demographic data
    • eDM – Segmented content
    • Preview of eDM
    • Share on Social Media
    • How to succeed designing your newsletter
    • Templates in isave.eDM
    • Setting up lead scores on contacts
    • Setting up a campaign trigger
    • Bounce
    • Setting up an SPF Record (reduce SPAM rate)
    • Delete duplicate rows from a list in Excel
    • eDM – Segmented content
    • eDM reports app for iPhone / Android
  • PURL
  • Campaign
  • Upgrades
Follow

Address in basket


Here are some of the things you should keep in mind when creating an address in Isave. The addresses used in the basket and can be linked to existing units and will only appear to people who are associated with this department. It is therefore advisable that the units you want to use in the firm are created before adding addresses. Many wonder why the address information basket is detached from the address information on the departmental level, and the reason for this is to ensure the needs of larger corporate structures have multiple locations within each department structure. There are two ways to add addresses for: one by one manually or via CSV file upload.

Add addresses manually

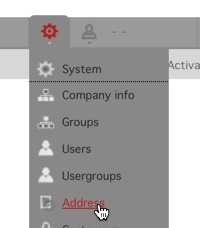
Go to System // address

A company or its Groups/Departments may have several addresses depending on various policies in each company. An excample of this could be a company were several “GROUPS” or departments have each own delivery addresses, but only one common invoice address.

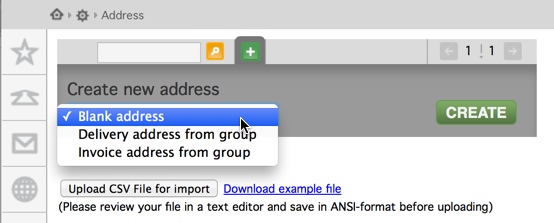
Select “Blank Address” for empty fields, “Delivery address from group” to collect the shipping address of an existing department or “Invoice address from group” to retrieve billing address of an existing department.

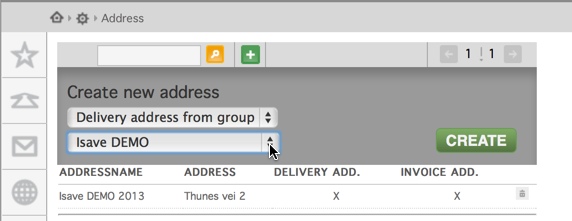
Select what kind of address you want to create. A new drop down will show up. Choose which group/department the address is for.

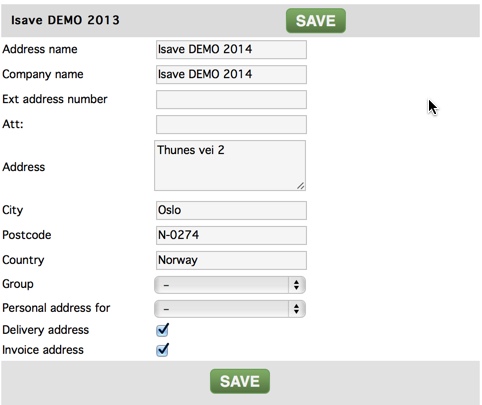
Enter the customer address information and click SAVE. Note that you must check the check box if the address is a delivery and / or invoice address. If you are connecting a branch address so that it only appears for users associated with this department selects one branch in dropown list.

Add addresses with CSV file

Download example file for Adresses here

Be sure to fill in all the fields that are relevant.

AddressName = Address Name (appears in the dropdown list for users)

Group Name = Company Name (appears on the invoice / delivery note)

ExtAddressNumber = Unique ID for this address (if one should oppdatre via CSV at a later date)

Address = Address (Post and / or street address based on checkbox Shipping address / invoice address)

City = City

Zip = Zip

Country = Country

ExtGroupNumber = Department (must match the number / name is in this field under the department to associate with)

DeliveryAddress = Delivery Address (Put an X in the box for the check box should be checked)

InvoiceAddress = Invoice Address (Put an X in the box for the check box should be checked)

Languages

  • en  English

Whats new

  • Dynamic “sending data” in eDM
  • New editor for eDM and PURL
  • Be mobile optimized!
  • Upgrades
  • eDM – Segmented content

Table of content

  • FAQ
  • Print
    • Typical print work flow
    • Mass update (How to quickly create a webshop in Isave)
    • Merge print template with datalist or CSV
    • Linking Data to Templates
    • Adding a static document
    • Adding templates & documents
    • Templates - how to - checklist
  • ADS
    • Typical ad workflow
  • FILES
    • ARTICLES
  • PURL - Personal landingpage
  • eDM
    • Bounce
    • Setting up lead scores on contacts
    • Share on Social Media
    • An introduction to isave.eDM
    • Demographic data
    • Handling Subscribers
    • How to succeed designing your newsletter
    • Templates in isave.eDM
    • Export Excel to CSV
    • Delete duplicate rows from a list in Excel
    • Preview of eDM
    • Setting up an SPF Record (reduce SPAM rate)
    • eDM - Segmented content
    • eDM reports app for iPhone / Android
  • SYSTEM
    • Order mails
    • Company Info
    • Groups
    • Users
    • Address in basket
    • Customers
    • Specifications
    • Managing Suppliers
    • Jobs
    • Orders
    • My profile
    • Reports
    • Ads Archive
    • Deploying & Managing Client Microsites
  • Campaign
    • Setting up a campaign trigger
    • Setup Campaign
  • DATASTORE
  • Video
  • Upgrades

User type categories

EvoLve theme by Theme4Press  •  Powered by WordPress isave.wiki
isave.DIALOG Resource Center

  • en English