
isave.System
How to remember my isave password
If you do not want to go around and remember your password to iSave we have two solutions:
- Use a Third-Party Account
Click the button “Sign in using a third party account”

We support, Google, Yahoo, OpenID and AOL. - Let your browser remember your login
Tip! Unless your browser automatically remember the password, you can force it to do so. Here is a recipe for Internet Exlorer 8.
- Go to Tools> Internet Options

- Choose content > AutoComplete > Settings

- Select both User names and passwords on forms and Ask me before saving passwords. Next time you just click in the login box and will be prompted with your account name.

Tip 2! For FireFox use this setting Tools > Security > Remember passwords on web pages.

What is a dummy site?
The dummy site setting is only used for demo sites!
When this settings is used on a site, the site will not be invoiced as a regular Xpress site.
To set a site as a dummy site, contact support@isave.no
Note that the setting will result in some limited features such as:
1. Limited eDM sending to 10 random contacts
2. No Hi-res file available for download.
3. No delivery of order files.
(order mail will be sent, and orders will show in order details, but files will be stripped).
The site will also be tagged with a dummy site banner with the text: This is an isave demo site. Not for commercial use!

How to clear cache memory
Shortcut: Chrome – IE6 – IE7 – IE8 – IE9, 10 and 11 – Firefox 2 – Firefox 3 – Firefox 4 – Safari – Safari 7 – Opera
What is browser cache?
In order to speed up web browsing, web browsers are designed to download web pages and store them locally on your computer’s hard drive in an area called “cache”. Browser cache (also know as Internet cache) contains records of every item you have viewed or downloaded while Internet surfing. So when you visit the same page for a second time, the browser speeds up display time by loading the page locally from cache instead of downloading everything again.
Although storing Internet cache makes web browser faster as it usually takes your computer less time to display a web page when it can open page’s elements or even the entire page from your local Temporary Internet Files folder, You sometimes want to overrule the Internet cache, for Example to see changes you made to a webpage you just uploaded. On Refreshyourcache you can find tutorials on how to refresh the cache from your browser.
Clearing Cache Memory
To ensure you see the latest version of a site you need to clear the cache memory. This is done by doing a force refresh by pressing both control and F5 buttons simultaneously on your keyboard (depending on your browser).
Force Refresh
Someone just told you to “force reload” your browser to fix something. Depending on your operating system all you need to do is the following key combination:
Windows: ctrl + F5
Mac/Apple: Apple + R or command + R
Linux: F5
Browser specific guides
Most times a simple force cache refresh won’t work and you need to clear the cache by hand. Follow these guides for your browser.
Chrome
1. Click the Chrome menu on the browser toolbar.
2. Select Tools
3. Select Clear browsing data
4. Check ONLY the Empty the cache box and press the Clear browsing data.
Use the menu at the top to select the amount of data that you want to delete. Select beginning of time to delete everything.

Microsoft Internet Explorer 6
1. First click Tools and then Internet Options

2. Click the Delete files button

3. Make sure the checkbox for Delete all offline content is selected
Click Ok.

4. Refresh the browser

Microsoft Internet Explorer 7
1. First click Tools and then Internet Options
2. Click on Delete under Browsing history

3. Click on Delete files for Temporary Internet Files

4. Click Yes.

5. Refresh your browser (or press F5)

Microsoft Internet Explorer 8
1. Click first on Safety

2. Then click on Delete Browsing History under Safety

3. check the following checkbox Temporary Internet files and press Delete.

Microsoft Internet Explorer 9, 10 and 11
1. Select Tools (via the Gear Icon) > Safety > Delete browsing history….
NOTE: You can also access this menu by holding Ctrl + Shift + Delete.
2. Make sure to uncheck Preserve Favorites website data and check both Temporary Internet Files and Cookies then click Delete.
3. You will get a confirmation at the bottom of the window once it has successfully cleared your cache and cookies
Firefox 2
Step 1 First click Tools and then Options
Step 2 Click on Advanced
Click on Clear Now under Cache
Click on OK
Step 3 Click the reload current page icon
Firefox 3
1. First click Tools and then Clear Private Data

2. Make sure the Cache checkbox is selected
Click on Clear Private Data Now under Cache

3. Click the Reload current page icon

Firefox 4
1. Click the menu button and choose “Preferences”
2. Select the Advanced panel.
3. Click on the Network tab.
4. In the Cached Web Content section, click Clear Now.
Safari
Force Refresh Safari
Most times a simple force refresh will do the trick, you can accomplish this with the following key combinations:
On the PC: Command + R
On the Mac: Apple + R
Or try this method
1. First click Safari then click Empty Cache

2. Click Empty button

3. Click the reload current page icon.

Safari 7
1. Safari // preferences // advanced
2. Check the “Show Develop menu in menu bar” box
3. You will now have a “Develop” menu available. Select “Empty Caches” from the Develop Menu.
Opera
Step 1 Select the Tools menu and click Clear private data
Step 2 Click the Details button
Step 3 Click the reload current page icon
or
1. Settings > Preferences > Advanced > History
2. Click “Empty now”
If I get an error message, what do I do?
If I get an error message like the one below what do I do?

1. Click the info icon
2. Copy the text in the new dialog box that appears.
3. Run this link and send the result to your isave contact
I can’t upload images to isave
We have several methods for uploading images in isave and there should always be one that fits your configuration (except on handheld devices).
Try to update your plugins:
1. Adobe Flash
3. Oracle Java
If updating these plugins does not solves your problems,
then open this link and send the result to your isave contact
Can I send a notification of a FTP order
If the supplier is set up as a XML by FTP then no mail will be sent from Isave.

If you want to receive an notification when a order is delivered to your FTP server there are two possible scenarios you might want to explore.
1. Set up an e-mail notification in your FTP server software
2. Set up a OrderCopy mail on every department (GROUP) on the site that using the XML by FTP supplier that you want a notification from.

The OrderCopy field is located at the bottom of the GROUP input form. You might also use a semicolon separated string of e-mail addresses in this field (E.g.: orders@mycompany.com;name@customer.com).
Import datalist dropdown list values
If you are going to import a contact, person or group list with a spec field that contains multiple values (applies to drop down list, checkboxlist and radiobuttonlist) you must use the isave field ID of the value you want to set.
Eg. you have a dropdown list for gender on each contact card, and you want to set the value of the gender by importing the contacts.

Find the field ID by pressing the Add/show data button on the spec field.
System > Specifications > Database “Contacts” > Gender.

The ID to use in your CSV file is placed to the left under the column name called ID.
Disable your browser’s popup blockers
The following includes steps for disabling pop-up window blockers.
- Internet Explorer 7 (WindowsXP)
- Internet Explorer6 (Windows XP)
- Firefox (Windows PC)
- Firefox (Mac OSX)
- Mozilla (Mac OSX)
- Safari (MacOSX)
The following includes steps for disabling Brower toolbars.
- Yahoo toolbar popup blocker
- Google toolbar popup blocker
- AOL toolbar popup blocker
- MSN toolbar popup blocker
- Norton Internet Security/Personal Firewall popup blocker
How to disable Internet Explorer 7 popup blocker (Windows XP)
- From the Tools menu, select Internet Options.

- From the Privacy tab, uncheck Turn on Pop-up Blocker and click “OK”.
 For more information on Internet Explorer popup blocker please go to http://www.microsoft.com/windowsxp/using/web/sp2_popupblocker.mspx
How to disable Internet Explorer 6 popup blocker (Windows XP)
- From the Tools menu, select Internet Options.

- From the Privacy tab, uncheck Block pop-ups.
 For more information on Internet Explorer popup blocker please go to http://www.microsoft.com/windowsxp/using/web/sp2_popupblocker.mspx
How to disable the Firefox popup blocker (Windows PC)
- From the Tools menu, select Options.

- From the Content tab, uncheck Block Popup Windows and click “OK”.

How to disable the Firefox popup blocker (Mac OSX)
- From the Firefox menu, select Preferences.

- From the Preferences window, choose the Content button and then uncheck Block Pop-up Windows.

How to disable the Mozilla popup blocker (Mac OSX)
- From the Mozilla menu, select Preferences.

- From the Privacy & Security tab, choose Popup Windows. Uncheck Block unrequested popup windows, and click “OK”

How to disable the Safari popup blocker
- From the Safari menu, make sure Block Pop-Up Windows is unchecked.

- Or Safari > Preferences > Safety > Check the “block popup windows”
How to disable the Yahoo toolbar popup blocker
- Locate the Popup blocker icon and click the down arrow.

- Uncheck Enable Pop-Up Blocker.

For more information on the Yahoo toolbar please go to http://toolbar.yahoo.com.
How to disable the Google toolbar popup blocker?
- Click on the Google logo on the Google toolbar and select Options.

- Uncheck Popup Blocker, and then click OK.

For more information on the Google toolbar please go to http://toolbar.google.com.
How to disable AOL toolbar popup blocker?
- Locate the Popup blocker icon.

- Click on it until it says Allowed.

How to disable the MSN toolbar popup blocker?
- Locate the Popup blocker icon and click the down arrow.

- Check Allow Pop-ups.

For more information on the MSN toolbar please go to http://toolbar.msn.com.
How do I disable my Norton Internet Security/Personal Firewall popup blocker?
- Open Norton Internet Security’s/Firewall�s main window (you may click the firewall icon on the system tray or use Start->Programs->Norton Firewall)
- Click the Ad Blocking line.
- Click the Turn Off button.

Issues in older vertions of Internet Explorer
Due to limitations i Internet Explorer 2008 and older we recommend isave.DIALOG users to install Chrome Frame if you experience undesired behaviour in isave.DIALOG.
Chrome Frame is a secure plug-in that brings a modern engine to old versions of Internet Explorer.
Install Chrome Frame for IE here
Click the blue buttoon to install (no need for Admin rights to install).

User can’t see a spesific element
If you can’t see a genereated file (also refered as element) the issue might be that the element is created or modified by an other user or administrator. The solution is to set the filter level on the user to view ALL elements.
Change filter level on user
Go to System menu > Users

Set filter level to ALL.

Now the user can change the filter level to ALL and therefore see all elements also created by other users.

isave.Print
User can’t see a spesific element
If you can’t see a genereated file (also refered as element) the issue might be that the element is created or modified by an other user or administrator. The solution is to set the filter level on the user to view ALL elements.
Change filter level on user
Go to System menu > Users
Set filter level to ALL.
Now the user can change the filter level to ALL and therefore see all elements also created by other users.
isave.eDM
mailto links in newsletters
Can I use mailto links in a newsletter?
Yes use the syntax mailto:someone@example.com.
Can I add a subjectline to that e-mail?
Yes use the syntax mailto:someone@example.com?subject=This%20is%20the%20subject
Remember that blanks, carriage returns, and linefeeds cannot be embedded but must be percent-encoded.
Handle opt out (unsubscribe) manually
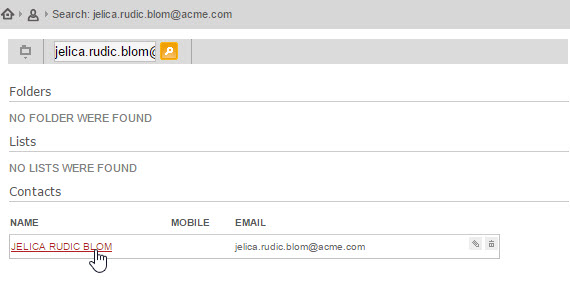
If you want to add a contact to an opt out list or the opt out all lists you just search for your the contact you want to opt out under the Lists tab in the Contacts module (we suggest using e-mail address).

Then click on the users name or the edit contact icon (pencil symbol).
Under contact details you select All lists from the opt out drop down list or a specific list.
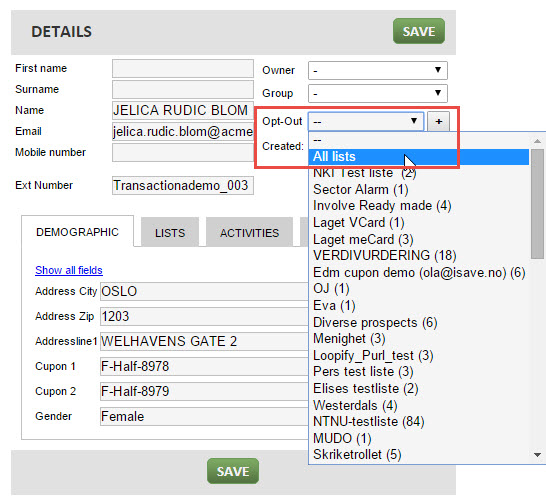
Press the pluss icon to confirm.
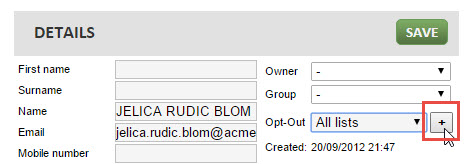
The interface will show what lists the contact is unsubscribed from in red text.

Remove a contact from the opt out (unsubsribe) list
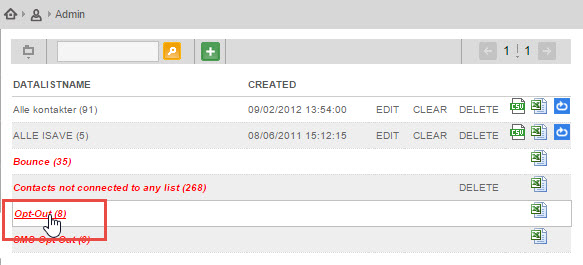
Start by navigating to the system opt out list marked in red text by clicking one of the folders under the Lists tab in the Contacts module.
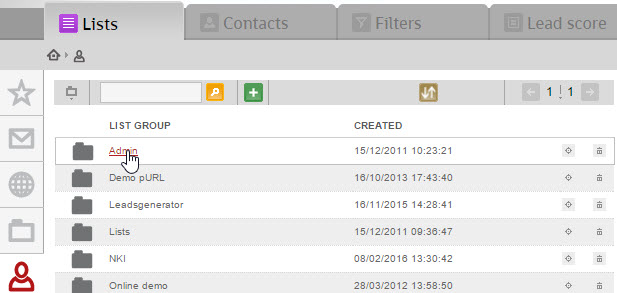
At the bottom of the regular lists you will find the opt out list. The opt out lists is not connected to any folders so it will show in all folders you enter. Click the name to show the contacts.
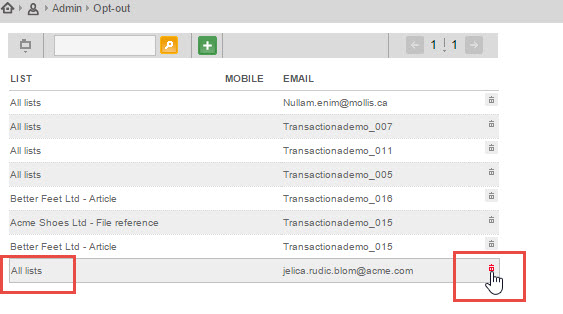
Find the contact by searching for the email and the click the trash-can icon to remove the contact from the opt out lists. In the column called Lists you will see what lists the contacts is opted out from.
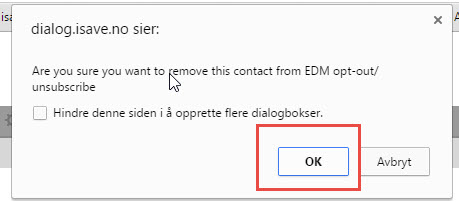
Press OK on the next pop up box. And the contact will now be removed from the opt out list.
How to add an e-mail link in isave.eDM
Select the text that you want linked to an e-mail address and press the insert URL icon.

Write mailto: followed by the e-mail address and press the Add button.

The link will be shown as a regular isave.eDM link when editing.

But upon saving it will be converted to the content of the Title field.

Newsletter image looks pixelated or not transparent
There is two scenarios you should use the check-box “Use Original”
- When the image looks pixelated or the image container is larger than 600px.
- When you use GIF or PNG images with transparency.
1. Select the check-box “Use Original”
2. Click the image to insert in the newsletter

Note that the images should be optimised for use in HTML newsletter (72 dpi) and not over 1mb in size (smaller is better when it comes to the file size).
How to link from an image in a EDM to PURL or Personal Print Document
This one we will optimize since so many is asking how, but as for now the method is as follows.
Write the “name” of your link and add the PURL link by clicking the “insert hyperlink” icon.

Change to HTML mode in the current text box.

Change the code to (##LINKURL_21660##). “LINK” changes to “LINKURL”.
Your image HTML code will be something like this:

See HTML sample here for PURL and Personal Print Document button.

If your image recourse is not on-line on a public website you might also use a Template Image link to point to the button for your PURL. Start by uploading your custom button to the eDM template. Press the ADMIN button on the template.

Select the Images Tab. and press the “upload images” button.

Select the image you want to upload.
Now you can use the code (##TEMPLATEIMAGE##) followed by the filename of the uploaded file (including the file ext.).
See HTML sample here for TELL A FRIEND button.
See HTML sample here for PURL and Personal Print Document button.
How to use split testing
First specify two alternative texts in the subject line of the newsletter you wish to test.

Then enter the percentage of the total list to test out your two subject lines. Finally decide the time and date when the rest of the list should receive the same newsletter. Based on the response to the split-test, the remaining newsletters will automaticly be sent using the topic that got the best response.
User can’t see a spesific element
If you can’t see a genereated file (also refered as element) the issue might be that the element is created or modified by an other user or administrator. The solution is to set the filter level on the user to view ALL elements.
Change filter level on user
Go to System menu > Users
Set filter level to ALL.
Now the user can change the filter level to ALL and therefore see all elements also created by other users.
E-mail client preview
The isave.eDM module have a bulit in e-mail client preview that let you check how your newsletter looks in different e-mail clients.
Click the green check icon above the newsletter preview and the test will load in a seperate window.

The test can also be reached from the send tab in the isave.eDM module.

We use a third party vendor called Email on Acid and the test consist of
E-mail preview in 16 desktop e-mail clients, 9 mobile e-mail clients and 22 web e-mail clients. You can switch image blocking on and off to ensure that your communications is getting through. You can also get HTML analysis, tips and tricks.

Print templates
How can I download a template from isave

Choose the blue Administrator button on the template.

Choose the Template Packages tab and press the DOWNLOAD button. Note that the packages is sorted by upload date and the newest packages are found at the top.
How can I set a custom word spacing
If a template requires an other spacing than the default spacing provided by the selected font you might use the feature called the Custom Word Spacing.
Reach this setting from the Text/Paragraph (F9) menu in studio or define a new Paragraph style.

Select Custom in the Word Spacing drop-down menu.

Set a value lower than 100% in the default field to gain a more compact spacing between words. Set a value higher than 100% in the default field to gain a more spaces between words. Note that the Minimum value must be less than the default value and the maximum value must be higher than the default value.
Download this sample to see it in use.
This method also applies to the Custom Letter Spacing.
